Monday! Do you love Mondays, or do they make you groan? I love the back to school part, but not the waking up early, making lunch, rush off to school part. Often Monday mornings when I’m driving them to school, I look in my review mirror, and see Jordan hasn’t done his hair, and they both have Nutella on their faces from breakfast. Woops! 🙂
We had an awesome weekend, especially Saturday. We went down into the States to visit the Costco in Bellingham, then went to the town of Lynden. I love that place. It is a quaint town, very Dutch (my heritage is Dutch) and full of antique shops and consignment stores. I love, love, love the fact that my hubby and my kids love antiquing and thrifting as much as I do! So fun digging through treasures with the kids…. and showing them what kind of phone mommy and daddy used to use when we were kids. Gulp. Those are in antique shops already?!?
Anyways, today I want to show off show you a favorite project of mine.
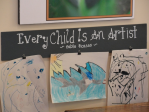
My kids create masterpieces, and the only place I have been showing them off so far is on the fridge… our fridge is getting a little crowded! One day while window shopping in Fort Langley, I spied something like this, and have been waiting for the right spot that was worthy of making it for. So when Abby took up residence in the corner of our living room, the time had come to make it.
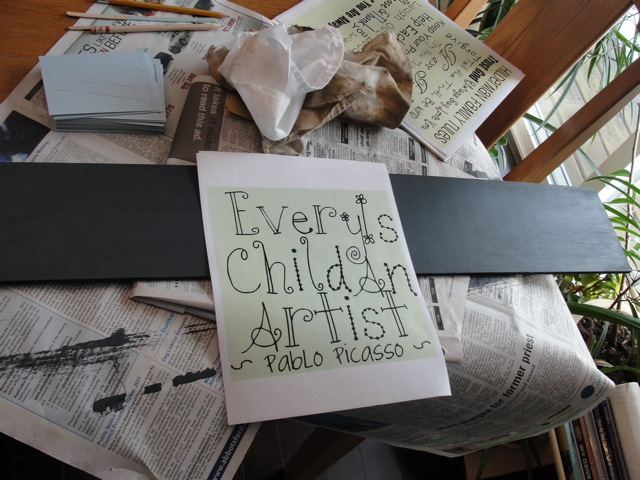
From the free scrapwood we collected from Rona, I picked the size needed, and painted it this cool graphite black… I’m sorry, I don’t remember the name of this paint. I purchased it off a paint chip at Rona on a whim for my desk re-do, and didn’t keep the chip. I did 2 coats of paint.
Then I found this website called www.Picnik.com. I am in love with this site, and am in mourning, as they are closing it down in April. 😦 No idea why, but it is very, very sad. On picnik, I chose my font, and came up with this,
If you follow my facebook page, you would have seen this already… betcha didn’t know where I was going with it though, right? 🙂 (to view a tutorial on how to do this, visit this blog here.)
(to see a better tutorial on my transfer method, please see my post here.)
For painting the words on, I used a product from Michaels, called Sharpie Poster Paint. It looks like a Sharpie felt, and works amazing. I’ve used the same one for a bunch of different projects now, and haven’t run out…. and soooo much faster than using a paintbrush! Awesome. (and no, I wasn’t paid to say this, I just love it SO much!)

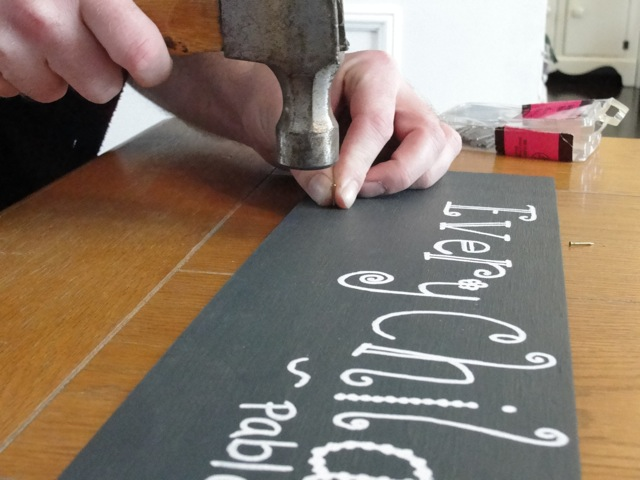
... I then measured the centre, and 4 inches in from each side, for placing of the nails (I wanted 3 nails)...

...hubby used a drill to make little holes for the nails (wanted to make sure the nails didn't go through the board!)...

...added the nails.... I ended up taking the nails out and adding hot glue to them before replacing them for staying power, in case the kids yank at them...
The third piece of artwork isn’t hung in some of these posts, the kids were getting real antsy at this point, and I just needed to take some pictures and get it done! Ahh, real life.
Do you love it? Check out my For Sale Page for more info!
thanks for reading!!
~ Leanne
If you are just visiting my blog, thanks for visiting! I love comments, and I love, love new followers… to follow and receive my postings by email, just find the spot at the top right hand corner where it invites you to add your email.
I’d also love for my readers to click on “Like” (below) if you liked today’s post, and of course give me your comments, anytime! Just click below where it says “Leave a Comment”. Thanks!!


LOVE IT! How much are you selling these little babies for? I’d like one with 5 clips please…
Thanks Kristin! If you are seriously interested, i can do it! I’m thinking $25. $5 more if you want it in a different color.
🙂 Leanne
I attempted to follow the link to figure out the transferring of the lettering but the link didn’t work. How’d you do this?
Hi Jessica,
Thanks for letting me know the link didn’t work, I’ll have to fix that! On the post I had this link: http://youseriouslymadethat.blogspot.com/2011/12/diy-subway-art-tutorial.html
And that will give you a tutorial on how to create creative wording on http://www.picnik.com…. Don’t fall in love with this website like I did though, because they are shutting it down in April! 😦 For transferring the letters onto the board, I color the back of the paper, with either pencil, crayon, or chalk. You can see an example of this in this post of mine: https://becauseithinkican.wordpress.com/2011/11/24/a-teachers-christmas-gift/ I hope this answers your question, if not, please email me back, or comment again.
🙂 Leanne
That is so cute! I love the font you used and your transfer method is great! I so need to make one of these for my prolific little artists.
Thank you Ellie! Have fun making it!
Love it! I’ve been wanting to make a sign for a spot going down to our playroom. I may just give this a try! Thank you for sharing! I found you at the Oopsy Daisy Party!
Stopping by as part of the BSN bloghop. I think it’s great that you promote your childrens artistic talents. It keeps the imagination going 🙂
Thanks for stopping by Heather! I’ll swing by your blog soon too!
I love this idea! My munchkin is so proud of her art work. This is a great idea with the clips already attached. I’m your newest follower. If you get a chance stop by http://www.thenymelrosefamily.blogspot.com to check out some of our latest creations. Thanks for sharing!